Flower Arranging 101
Planning Preparing Making Questions
Flower arranging can be fun and rewarding, even if you don’t have in-depth knowledge about flowers or any special training. Here’s a few simple guidelines.
Planning Your Flower Arrangement
Step 1:
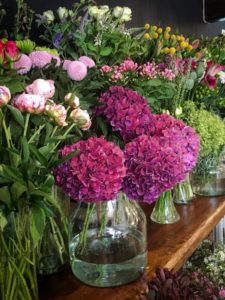
Choose in-season flowers
Choosing in-season flowers will cost you less money when you are making the arrangement for a special occasion.
Spring: The most popular flowers for springtime include daffodils, peonies, tulips, sweet peas, narcissus, hyacinths, anemones, ranunculus, lilacs, delphiniums and boronia.
Summer: The most popular flowers in summertime include lilies, gerbera daisies, sunflowers, snapdragons, hydrangeas, larkspur, freesias, lavender, forget-me-nots, bells of Ireland, chrysanthemums and tuberoses.
Autumn / Fall: The most popular autumnal flowers include dahlias, marigolds, zinnia, statice, chrysanthemums and aster.
Winter: The most popular winter flowers include camellias, poinsettias, star of Bethlehem, star gazer lilies, jasmine, holly, cosmos and amaryllis.
Year-long: Flowers that can be found in-season all year round include orchids, gardenia, soses, lily of the valley, carnations, baby’s breath, protea, scabiosa, heather, gladiolus, eucalyptus and calla lilies.
Step 2:
Choose a vessel
The vessel you choose to make your flower arrangement in depends on the style you are going for. Almost any type of container can be used for a flower arrangement, as long as it’s suitable for the height, weight and look of the flowers being used.
- In terms of vases, long, thin, trumpet-shaped vases work best for delicate, thin stemmed flowers like lilies and crocosmia. Shorter, wide vases are better for large-headed, shorter-stemmed flowers like roses and chrysanthemums.
- Beyond standard vases, feel free to use your imagination when it comes to containers. Use egg cups, champagne bottlesm wide-brimmed bowls, old boots, umbrella stands, teacups or candle holders.
Step 3:
Use complementary colors
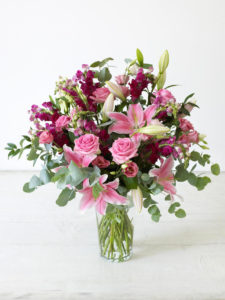
Color is very important when it comes to flower arrangement, but there are no hard and fast rules when it comes to what color combinations work best. It will depend on the style and mood you’re going for. However here are some things to keep in mid:
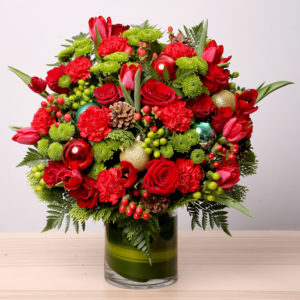
- Add complementary colors to your arrangement for a cheerful and varied look. Try mixing red and orange flowers, with a little bright green of freshness. Or mix a selection of pink and purple flowers, with a little white baby’s breath for softness.
- Try mixing a selection of flower varieties in a single uniform color, or in varying shades of the same color. Add some depth by including a cuff of green leaves around the outside.
- Alternatively, you can try arranging a single variety of flowers in a selection of different colors, such as orange, white and yellow gerbera daisies or pink and purple tulips.
Step 4:
Add some texture
Flower arrangements shouldn’t be all about flowers though. You can add some texture to your arrangement by adding in some greenery, some woody stalks or other, season-appropriate items.
Step 5:
Consider the location of the finished arrangement
One final thing to consider is the purpose and location of the arrangement. Consider the color scheme and general mood of the room you intend to place it in, so you can choose a design to match. You will also need to consider the amount of space available.
- For instance, some brightly colored flowers can brighten up a dark hallway or add a splash of color to a monochrome bathroom, while some softer, pastel colored flowers might compliment an airy, sun-filled room.
- In addition, the location of the finished arrangement should be considered when planning its size. A small bowl of colorful daisies might look cute on a coffee table, but be swallowed up on a kitchen counter. A tall vase might look great on a dresser in the hallway, but hinder conversation on a dining table.
Preparing the Flowers and Materials
Step 1:
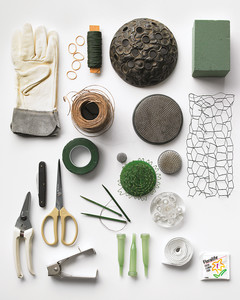
Gather the necessary materials
Before you jump straight into your flower arrangement, it’s important to have all of the necessary materials easily at hand – this will make the process more efficient. Depending on the type of flower arrangement you are making, you will need a selection of some or all of the following:
- A clean vessel to contain the flowers – this could be a vase, a bowl or a basket (amongst other things) depending on the number and size of the flowers.
- Some floral foam or a flower frog, to secure flowers in wide-mouthed containers.
- Some floral tape or elastic bands to hold flowers together, especially in tall, narrow vases.
- A sharp knife or garden clippers to cut the flower stems.
- Some preservative solution (often supplied with the fresh flowers).
- A clean, spacious work surface, lined with newspaper.
- Selection of flowers and greenery.
Step 2:
Cut the stems and strip the leaves
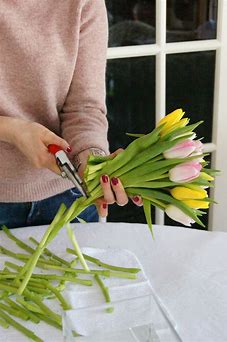
Before you place the flowers in an arrangement, it is necessary to cut the stems. This allows the flowers to absorb water more easily, keeping them fresh. Cut the flower stems diagonally, about an inch from the ends, using a sharp knife or garden shears. It’s not advisable to use a kitchen scissors, as these can crack the stems and prevent the flowers from getting enough water.
- If you plan on leaving the flowers to sit in a vase for any length of time before arranging them, remember to give the stems a second snip directly before placing then in the arrangement.
- Before placing the flowers into the arrangement, you will also need to remove any leaves that are below the water level. This is important, as otherwise the leaves would rot, contaminating the water.
- One trick for keeping roses extra fresh is to soak the stems in an inch of boiling water immediately after cutting them. Leave them there until the water turns tepid, then give the stems a second snip before placing them in cool water. Wrap the flowers in brown packing paper to protect them from the heat.
Step 3:
Prepare the vessel
The next step is to prepare the vase, bowl, box or whatever vessel you plan on using for the flower arrangement. Make sure the vessel is nice and clean, with no residue or dirt.
- If you’re using floral foam (which is great as it holds the arrangement in place and also provides the stems with water) allow it to soak in the preservative solution for 15 minutes, then use a sharp knife to cut it to the shape of the container. Place the wet, cut foam into the vessel and secure with a little floral tape.
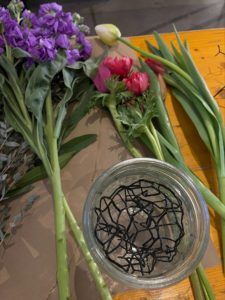
- If you’re using a flower frog, chicken wire, or a cellophane grid (which are good for holding tip heavy flowers or those with woody stems), place it into the container and secure with some tape or a little floral adhesive.
- Alternatively, you can crisscross the woody stems of your chosen greenery across the bottom of the vessel. This creates a kind of organic grid which successfully holds your arrangement in place.
Step 4:
Add the water
If you’re using a flower frog, grid or allowing the flowers to stand on their own, you should add the water to the vessel at this point. If you’re using floral foam, there is no need to add additional water.
- Pour the water into the vessel, then add a single package of preservative solution. If you don’t have any preservative solution, try adding a couple drops of Clorox bleach to the water instead – this kills off any bacteria and helps to keep the flowers fresher for longer.
- If you have any closed buds and you want them to open quickly, use warm water instead of cool water. This works best for flowers like roses and ranunculus, which have tightly closed flower heads.
Making the Arrangement
Step 1:
Add the larger, more dominant flowers first
When you begin working on the arrangement, start with the largest or most prominent variety of flower first.
- Rather than adding one type of flower and then another, it’s better to work on the single flower type at a time. In this way, you can layer the different varieties, shapes and colors of flower evenly and create a more balanced arrangement.
- Work in a circle, placing in flower around the outer edge of the container. If you’re using wet foam, the stems should slide in easily. If they don’t, use a sharp object to poke a hole first, then insert the stem – just be careful not to make the holes any wider than the flower stems or the flowers won’t be secure.
- Turn the arrangement as you work to ensure that it looks even on all sides – a lazy Susan is great for this!
Step 2:
Layer the flowers as you go
Once you have finished with the first circle of flowers, move on to second, using a different variety of flower.
- This circle of flowers should be inside the first. Try to create a domed effect by leaving the stems slightly longer on the inner flowers. The finished arrangement should look like a bunch of flowers growing on a hilltop.
- Continue to layer the flowers in this manner, one variety after another, according to the size and number of flowers in your arrangement.
Step 3:
Use an odd number of flowers in each layer
One of the main rules when it comes to flower arranging is to use an odd number of each variety of lower.
- For instance, you might have 7 red roses in the outer circle, 5 white roses in the inner circle and 3 sprigs of baby’s breath interspersed between them.
- The uneven number of flowers helps the arrangement to look less uniform and more organic.
Step 4:
Pay attention to height and width
The height and width of your arrangement is another factor to consider when making your arrangement.
- The general rule when it comes to height is that your arrangement should be one and half times the height of the vase or container it’s held in.
- There’s no clear-cut rule when it comes to the width of your arrangement, but it should be wide enough to balance out the height.
- Rotate the arrangement as you work to ensure that the height and width are even on both sides.
Step 5:
Add any leaves, berries or other greenery last
When you have arranged all of the flowers to your liking, you can add the final touches by inserting any greenery, leaves, berries or other decorations.
- This step is important – not only to add interest and texture to your arrangement – but also because the greenery helps to separate the blooms, giving air room to circulate in between them so the flowers stay fresh.
- Using filler material also helps to give the impression that there are more flowers in the arrangement than there actually are, so you can create an extravagant looking arrangement without the extravagant price!
Frequent Questions & Answers
Q: How do I stop tulips from drooping?
If tulips stems are not cut under water, the hollow stems will fill with air and they will not absorb water and they will wilt and die. Cut under warm water at a slant and put in water IMMEDIATELY so the stems cant fill with the air. The water droplets on the end of the stem will keep the air out until they go into the water (about 3 seconds) Tulips lean to light or gravity so they will not stay upright unless kept away from windows, or supported with wire.
Q: How can I stop flowers from wilting?
All natural flowers will eventually wilt, but you can prolong the process by keeping them out of dirsct sunlight and changing the water each day.