| Botanical Name: | Hydrangea spp. | |
| Plant Type: | Trees, Shrubs, and Vine | |
| Sun Exposure: | Full Sun, Part Sun, Shade | |
| Soil pH: | Acidic, Neutral, Neutral to Slightly Alkaline, Slightly Acidic to Neutral | |
| Bloom Time: | Summer, Fall | |
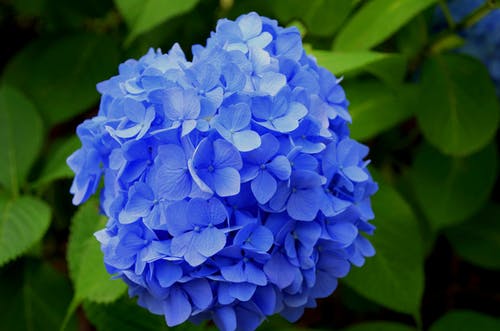
| Flower Color: | Blue, Green, Pink, Purple, Red, White | |
| Hardiness Zone: | 3, 4, 5, 6, 7, 8, 9 | |
| Special Features: | Attracts Butterflies |
How to Plant and Care for Hydrangeas
With immense flowers heads, hydrangeas flaunt an old-fashion charm in summertime that’s hard to resist.
About Hydrangeas
Unrivaled in the shrub world for their beautiful flowers, these elegant plants are easy to cultivate, tolerate almost any type of soil, and produce abundant blooms. Colors beguile with clear blue, vibrant pink, frosty white, lavender, and rose blossoms – sometimes all blooming on the same plant!
Hydrangeas are excellent for a range of garden sites, from group planting to shrub borders to containers. Varieties abound (every year, it seems, breeders present us with more options!), and gardener’s expectations of bloom size and color are boundless. To know how your hydrangea will grow, pay attention to the species, defined below, as some require different care. When you know what to expect, delights will be magnified.
Where to Plant Hydrangeas
- Most hydrangeas will thrive in fertile, well-draining soils that receive plenty of moisture. Add compost to enrich poor soil.
- Generally, hydrangeas prefer partial sun. Ideally, they will be given full sun in the morning, followed by some afternoon shade to protect from the hot midday sun. This is especially true for the Bigleaf hydrangeas (H. macrophylla), whose large leaves are prone to wilting. Some varieties are more tolerant of full sun.
- Space hydrangeas anywhere from 3 to 10 feet apart, depending on type. Always apace plants based on their expected size at maturity!
When to Plant Hydrangeas
- Autumn is the best time to plant hydrangeas, followed by spring planting. The idea is to give this shrub plenty of time to establish a healthy root system before the heat of summer or the extreme chill of winter, which makes the cooler shoulder seasons the best time to plant.
- Plant the shrubs in early morning or late afternoon. It’s generally cooler and the plant is less likely to suffer heat stress from direct sunlight.
How to Plant Hydrangeas
- Gently remove the hydrangea from its container and inspect the root ball, snipping off any dead or rotting parts and tease free the roots if the plant is especially root bound.
- Dig a hole as deep as the root ball and 2 to 3 times as wide. The base of the plant (where the stem meets the soil) should be level with the top of the planting hole.
- Set the plant in the hole and fill it half full with soil. Water generously. After the water is absorbed, fill the rest of the hole with soil.
- Water thoroughly once again.
How to Grow Hydrangeas from Cuttings
Hydrangeas can easily be grown from cuttings. They root readily and the process makes for a great lesson in propagation. Here’s how to do it:
- On a well-established hydrangea, find a branch that is new growth and that has not flowered. New growth will appear lighter in color than old growth, and the stem will not be as rigid.
- From the tip of the branch, move 4 to 5 inches down and make a horizontal cut. Make sure that there are at least 3 to 4 pairs of leaves on your cutting.
- Remove the lowest pair of leaves from the cutting, trimming them flush to the stem. Roots grow more easily from these leaf nodes, so if you can afford to remove more than one pair of leaves, do so. Be sure to keep at least 2 pairs of leaves at the tip end of the cutting, though.
- If the remaining leaves are quite large, cut them in half, removing the tip-half. This prevents the leaves from hitting the sides of the plastic bag you will place over the cutting later on (to keep the humidity up).
- (Optional) Dust the leafless part of the stem with rooting hormone and ant-fungal powder for plants (both available at a local hardware or garden store). This will encourage rooting and discourage rotting.
- Prepare a small pot and fill it with moistened potting mix. Plant the cutting in the soil, sinking it down to the first pair of remaining leaves. Water lightly to get rid of any air gaps around the stem.
- Cover the entire pot loosely with a plastic bag. Make sure the bag isn’t touching the leaves of the cutting, otherwise the leaves can rot. (Chopsticks or something similar can be used to prop up the bag and keep it off the leaves).
- Place the pot in a warm area that’s sheltered from direct sunlight and wind.
- Check on your cutting every few days to make sure that it isn’t rotting and only water again once the top layer of soil is dry. With luck, the cutting should root in a few week! (Check by gently pulling on the cutting; if you feel resistance, roots have formed).
GROWING
Hydrangea Care
Watering
- For the first year or two after planting and during any drought, be sure hydrangeas get plenty of water.
- Water at a rate of 1 inch per week throughout the growing season. It’s better to deeply water 3 times a week than sprinkle water in a shallow manner. This encourages root growth.
- Bigleaf and smooth hydrangeas require more water, but all varieties benefit from consistent moisture.
- Leaves will wilt if the soil is too dry, and flowering will be hampered by a lack of water.
- Use a soaker hose to water deeply and keep moisture off the flowers and leaves.
- It’s best to water in the morning to prepare hydrangeas for the heat of the day and to avoid disease.
- Add organic mulch underneath your hydrangeas to help keep the soil moist and cool, add nutrients over time, and improve soil texture.
Fertilizing
If your soil is rich, you may not need to fertilize hydrangeas. Too much fertilizer encourages leafy growth at the expense of blooms. The best way to determine your fertility needs is by using a soil test.
Apply fertilizer based on your specific hydrangeas. Each variety has different needs and will benefit from different application timing.
- Bigleaf hydrangeas can benefit from several light fertilizer applications in March, May, and June.
- Oakleaf and panicle hydrangeas do best with two applications in April and June.
- Smooth hydrangea plants only need fertilization once, in later winter.
Winter Protection
- In the fall, cover plants to a depth of at least 18 inches with bark mulch, leaves, pine needles, or straw in the fall. If at all possible, cover the entire plant, tip included, by making cages out of snow fencing or chicken wire, and loosely filling the cages with leaves. (Do not use maple leaves, as they tend to mat when wet and can suffocate the plant).
How to Change the Color of Hydrangea Flowers
It is possible to change the flower’s colors, but not instantly. Color correction takes weeks – even months. Wait until the plant is at least 2 years old to give it time to recover from the shock of its original planting. Also note that it’s easier to change blue flowers to pink than pink to blue.
It’s not every hydrangea that changes color. The color of some Bigleaf hydrangeas (H. macrophylla) – especially Mophead and Lacecap types – and H. serrata cultivars change color based on the soil pH.
Acidic soils with a pH of less than 5.5 produce blue flowers; soils with a pH greater than 6.0 produce pink flowers. White flowers are not affected by pH.
How to Prune a Hydrangea
As long as you know what type of hydrangeas you have, it’s easy to figure out what sort of pruning technique to employ.
| Hydrangea Type | When to Prune | Where Flowers Appear | |
| Bigleaf (H. macrophylla) | Summer, after flowering | On old growth | |
| Oakleaf (H. quercifolia) | Summer, after flowering | On old growth | |
| Panicle (H. paniculata) | Late winter, before spring growth | On new growth | |
| Smooth (H. arborescens) | Late winter, before spring growth | On new growth | |
| Mountain (H. serrata) | Summer, after flowering | On old growth | |
| Climbing (H. anomala subsp. petiolaris) | Summer, after flowering | On old growth |
Pruning Common Hydrangeas
The most common garden hydrangea shrub is the Bigleaf variety, Hydrangea macrophylla.
Bigleaf (H. macrophylla), Oakleaf (H. quercifolia), Mountain (H. serrata), and Climbing hydrangeas (H. anomala subsp. petiolaris) are pruned AFTER the flowers fade in summer. These varieties bloom on the previous season’s stems (“old wood”).
- Flower buds actually form in the late summer and flower afterwards the following season, so avoid pruning after August 1.
- Only cut away dead wood in the fall or very early spring.
- To prune, cut one or two of the oldest stems down to the base to encourage branching and fullness.
- If the plant is old, neglected, or damaged, prune all the stems down to the base. You’ll lose the flowers for the upcoming season, but also rejuvenate the plant for future years.
- It’s best not to deadhead (remove faded blooms) on the big Mopheads; leave them over the winter and cut them back in early spring (to the first healthy pair of buds). It’s fine to deadhead the Lacecaps; cut down to the second pair of leaves below the flower head.
- When growing H. macrophylla (and H. serrate) varieties in Zone 4 and 5, do not prune unless absolutely necessary, and then do so immediately after blooming. Otherwise, remove only dead stem in the spring.
Pruning Other Hydrangeas
Panicle (H. paniculata) and Smooth (H. arborescens) hydrangeas are pruned BEFORE flower buds are formed. These varieties bloom on the current season’s stems (“new wood”).
- Prune in the late winter when the plant is dormant. This means that if the buds are killed during winter, the plant will procedure new buds in the spring which will procedure blooms.
- In general, prune only dead branches, and do not prune to “shape” the bush.