Plants 101
Care | Potting | Food & Water | Challenges
General Care of Plants
Given the basics of light, water, food and warmth, plants are easy to care for. Light is very important. If your plants are spindly and stretched, they’re short of light, so give them more, it’s their only source of energy. Plants require water, but not so much that it drowns their roots: almost all survive dryness better than waterlogged conditions, so be careful not to overwater. Regular fertilizing makes a big difference, since soil nutrients may run out.
Temperature is often not too critical: if you’re comfy, it’s likely that your plants are too.
Choosing healthy plants
It’s important to take a few moments to check out your plant before you buy it to make sure you are getting one that is healthy and will grow strong. Unless you are particularly green-thumbed, it’s best to avoid choosing any of the damaged or sick-looking plants languishing in the “Clearance” section, however good a bargain they appear – they rarely recover.
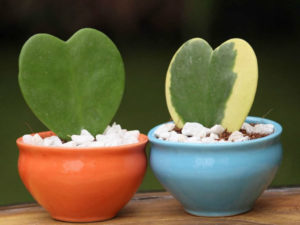
Choosing pots
Careful matching of pot to plant can significantly enhance the display. Almost any container can be used to hold plants, but there are two main types: those you plant and those that conceal the pot inside. If you are unsure what to choose, keep it simple; light colors and clean lines are never going to be wrong. As a general rule, flowery plants will take more textured, colored, and elaborate pots, while plants with strong architectural shapes look best in simple pots with clean lines.
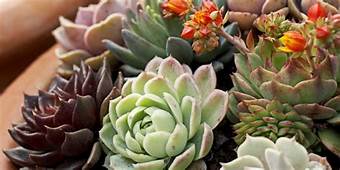
Succulent Care
Trendy and beautiful, succulents are a fun and low maintenance addition to you plant collection. They prefer sunny and dry conditions similar to cacti.
Light: Choose the brightest spot in the house, such as a south-facing window sill.
Water: Water thoroughly and then let the soil almost dry out before watering again. In the winter wait longer to water than you did in your growing season.
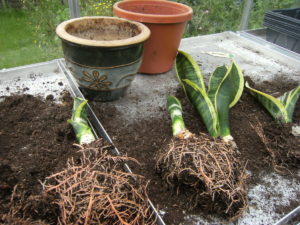
Potting
As plants get bigger, the roots become congested and may eventually need a bigger pot with more soil to satisfy their need for water and nutrients. Equally, you may just want to move your plant into a more attractive container. “Potting up” to a larger size is a simple task if you follow a few basic rules about drainage and soil. Don’t be tempted to pot into a vastly bigger container, since waterlogging may result.
Adding extra nutrients
Multipurpose potting mixes have a limited supply of nutrients, which are soon exhausted. Repotting provides the ideal opportunity to give the soil a boost by mixing fertilizer granules into the fresh mix. Through the effects of water and temperature, the granules release a steady supply of food to your plant over the whole growing season. Fertilizers come in several different forms but basically work the same way.
Granules should simply be mixed evenly into the potting ,ix.
Sticks of fertilizer and clusters of granules may be pressed into the soil surface. They gradually release their nutrients over several months: every time you water the plant, the roots receive a boost, and old potting mix is revitalized.
How to repot your plant
Repotting gives plants a new lease on life and encourages new, healthy shoots. Use a pot just 1 inch (2-3 cm) wider than the old one. Ideally, repot your plant at the start of the growing season or when the plant is in active growth. Avoid repotting when the plant is dormant in winter, since damaged roots may rot on inactive plants.
- A 1 inch (2-3 cm) layer of Styrofoam pieces or pot or crockery shards across the hole provides necessary spaces for good drainage, and helps prevent waterlogging.
- Put a layer of potting mix in the bottom of the pot to bring the top of the root ball 1 inch (2-3 cm) below the rim. This will provide just enough space for watering.
- Carefully feed in the potting mix around the plant. Firm it in gently, but avoid over-compacting the soil, since this hinders drainage and drives out all the air.
- Add a layer of mulch for an attractive finish. It reduces evaporation, but makes checking for water more difficult. You’ll need to scape it away from the potting mix to check moisture levels.
Top-dressing
Plants in large pots are often too large or heavy to remove for repotting and may already be in as big a pot as you want. To keep them healthy, apply a top-dressing of fresh potting mix each year in spring.
1. Remove the top 1 inch (2-3 cm) of soil. Do not worry unduly about damaging fine roots.
2. Spread a 1 inch (2-3 cm) layer of moist soil mixed with fertilizer over the surface.
Food & Water
Incorrect watering is probably the most common reason for the untimely demise of a lot of plants. Just like humans, if you give them too much, you can drown them; but if you don’t provide enough, then they’ll die of thirst. Take the time to work out when your plants are ready for a drink and how much they like, and you should get along fine.
When to water
Check regularly and you’ll learn that some plants dry out faster than others. Large, leafy plants and those in direct sun are usually among the first. Plants in terra-cotta pots dry faster than those in glazed or plastic pots. Do not be tempted to water everything just because you have the watering can out: only water plants that need it – most are ready when the top 1/2 inch (1 cm) is dry.
Press your fingers unto the soil surface to find out how moist it is – scrape away a section of any mulch so you can test the potting mix. As you become more familiar with the plants, you may be able to tell how dry they are by lifting them and judging their weight.
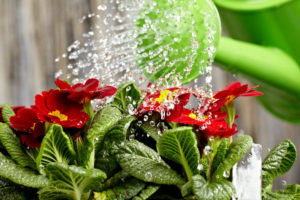
Watering from above
This is often the most convenient way to water, and is suitable for the majority of plants, particularly those with woody stems. It ensures that the soli is evenly moist as water is drawn down by gravity. Make sure there is a 1 inch (2-3 cm) gap between the soil surface and the lip of the pot: this allows space for a good dose of water, and you won’t have to wait while it soaks in. Make sure that plants do not stand in excess water.
Watering from below
Plants with congested and fleshy stems, such as African violets (Saintpaulia), peperomias, and cyclamen, are prone to rotting in the center if the plant gets wet, so it is important to water these plants from below. You can also use this method to apply liquid fertilizer. If there is layer drainage material in the base of the pot, you will need to use a deep saucer or bowl to ensure that water reaches the roots. Most plants need about 20 minutes’ soaking time.
1. Pour water into the saucer to avoid wetting the crown of the plant, and leave the roots to soak up as much liquid as they need.
2. After about 20 minutes, drain away any water that remains in the saucer. Do not allow the plant to stand in water permanently.
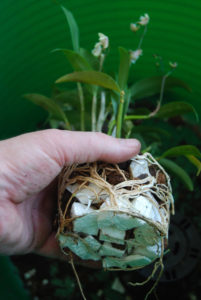
Dunk and drain
Orchids are grown in loose, light potting mix, and it is often difficult to tell when they are ready for a drink. These plants need careful handling because they are prone to damage from overwatering. As a rule of thumb, give them a weekly dunk in a bowl of tepid water. This allows the potting mix to absorb enough water without the risk of giving too much.
1. Remove the cachepot (if you have one). Carefully place the plant, still in its pot, in a bowl of soft water at room temperature, and leave it to stand for around 10 minutes.
2. Take the plant out of the bowl and let it drain thoroughly – for about 30 minutes – before returning it to its cachepot and putting the plant back on display.
Special treatment
Epiphytic plants – those that grow in trees – often have poorly developed roots whose main purpose is anchorage. These plants acquire most of the water and nutrients they need through their leaves rather than from their roots, and some have evolved to catch water in their vase-like rosettes.
A spray of soft water on plants like Tillandsia cyanea provides all the water they need. Add quarter-strength liquid fertilizer every month.
Fill the center of rosette-forming bromeliads like aechmeas and vrieseas with soft water to supplement the water taken up by the roots.
Vacation watering
What should you do with plants when you go on vacation? If you have a willing neighbor, that’s fine (but if you worry that a well-intentioned neighbor, eager not to let the plants die of drought, may overwater them instead, then set up reservoirs or capillary systems and ask them to top off the water levels). Plants can usually cope without you for a long weekend: water them well before you go and move them to a cool room out of the sun. If it’s practical, put them all in the bathtub and water them there. Some pots have a “self-watering” device – little more than a reservoir of water below the plant into which the roots grow – but your plant must already be established in such a pot for it to be of use.
Capillary System – A capillary watering system can be simple to set up and, depending on their size, may be enough to see your plants through a week’s vacation. Fill the sink and place capillary matting (or a towel) over the kitchen drainer and along the bottom of the sink. Stand your plants on top of the matting or the drainer. Moisture travels up the matting, and spreads to the base of the pots, where it is absorbed by the soil. The method is not suitable for pots with crocks or drainage material in the base, since the mat must be in contact with the potting mix, and of course any cachepots must be removed. If possible, do a test run for a day: this allows you to gauge how long a full sink will last and make sure the plug does not leak.
Wick System – A wick system may suit plants that are too big to move. Put a bowl of water above level of the soil, weight down a strip of capillary matting with a stone, and press the other end into the potting mix.
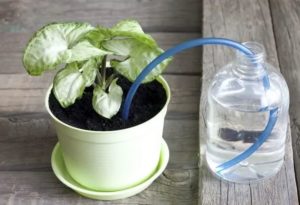
Reservoir System – Create a large reservoir that dips water into the soil via a hole in the cap by cutting the case off a plastic bottle. Only a tiny hole is needed in the bottle top. It is wise to experiment before you go away.
Liquid fertilizers
Plants benefit greatly from regular fertilizing. This will usually be necessary a few weeks after you buy your plant. Although you can mix controlled-release fertilizers into the potting mix, you will probably find it more convenient to provide a diluted fertilizer at regular intervals when you water. A balanced liquid fertilizer, at full or half-strength, will satisfy most plants, but there are special formulas available to satisfy the particular needs of orchids, citrus, ericaceous (acid-loving) plants, and foliage plants.
Some fertilizers come in powder form. Simply follow the manufacturer’s instructions, and dissolve the required amount in water.
Liquid formulations are very easy to make up. Measure out the amount of water , add a few drops, and apply with a watering can.
Challenges
Watering problems
Watering seems to cause a disproportionate amount of angst. We fret if we forget to water plants and worry when they wilt, or strive to do the right thing and end up overwatering – which, because it kills the roots, also makes plants wilt.
Drought is fairly obvious – the soil is dry – but wilting due to overwatering is more insidious: continually wet potting mix slowly destroys the roots. Overwatered plants can be revived, but you’ll also need to give them some TLC.
Drying out plants
If you find you have overwatered your plants, all is not lost: it may be possible to dry it out. Remove the pot and wrap the rootball with paper towels or newspaper until all the excess moisture has been drawn out of the soli. Then keep it only just moist and out of direct sun for a few weeks while the roots recover.
Reviving a wilted plant
The effects of underwatering can look dramatic: a plant may quite suddenly appear to collapse overnight and greet you with limp, wilted stems drooping sadly over the sides of its pot the next day. Sol that is too dry shrinks away from the side of the pot, and allows water to pass straight through it when you attempt to rehydrate it by watering normally.
1. When confronted with a wilted plant, before you take action, make sure dry soil really is the problem. Confusingly, wilting may be due to over watering, or vine weevil damage.
2. Move it to a cool area out of direct sun and place the plastic pot in a bowl of tepid water. If the root ball is so dry that it floats, weight it down with a stone on the soil surface.
3. After soaking for about 20 minutes, remove the bowl and let the pot drain for 10 minutes before replacing the cachepot. The plant should show signs of recovery within about an hour.
Deadheading
Many plants stop flowering once they have set seed, which means removing spent looms encourages new buds to form. Plants with large flowers like hibiscus look neater with old flowers removed, and this keeps fallen petals from resting on and rotting the foliage. Cut off as much of the flower stalk as possible to prevent rotting.
What’s wrong?
There are three main causes of ill-health in plants: pests and diseases, incorrect watering, and poor siting. The problem is that plants often react in similar ways to all these events with yellowing or browning leaves, wilting stems, or falling flowers and foliage. So how do you know what’s wrong? The first thing to remember is: Don’t Panic. Avoid jumping to conclusions, learn to read your plants, and try to work out what’s really bothering them. In the case of pests and diseases, your best defense is to exercise vigilance, and deal with trouble before it gets out of hand.
| Yellowing leaves | Leaf, flower, or bud drop | Scorched leaves | Pests and Diseases |
| – A sign of age Low leaves often turn yellow and drop off as plants grow: they are shed as they are inefficient. DON’T WORRY, this is natural. Remove old leaves as they fade to keep the plant looking net. | – Sudden temperature changes These can shock plants into shedding buds and leaves to conserve energy. PROVIDE more stable conditions | – Too much heat Hot conditions especially when combined with inadequate water cause scorched leaves. REDUCE temperature, increase watering, and raise humidity. | – Adult vine weevils are slow, flightless creatures that come out at night and chew notches in leaf margins. They are easily caught and picked off. |
| – Low temperatures Plants accustomed to warmth may become stressed if temperatures fall. This causes leaves to yellow, and may be accompanied by brown spots. MOVE PLANTS to a warmer environment to recover. | – The angle of light has changed AS plants adjust to the new light source buds become detached. AVOID turning these plants and make sure they are correctly lit. | – Not enough humidity Leaves lose water faster than it travels into the leaf, causing their tips and edges to dry out and turn brown. MOVE PLANTS to a more humid area or mist to raise humidity. | – Vine weevil grubs eat away at plant roots, unnoticed until the plant wilts. Chemical or biological nematode controls are available. |
| – Undernourishment Nitrogen is essential to produce chlorophyll. If soil fails to provide enough nitrogen, plants are unable to make chlorophyll or collect light energy. Plant short of nitrogen move it to where it is needed most, often the top of the plant, causing lower leaves to fade. REGULAR FERTILIZING with balanced fertilizer prevents poor nutrition. | – Underwatering The plant sheds leaves and buds to conserve moisture. CHECK soil and water plant. | – Soft, crowded, damaged, or wet plant tissue is at risk from attacks of gray mold. Prevent it by removing fallen leaves and practice good hygiene. | |
| – Hard water Some plants need nonalkaline conditions. Hard water raises the soil’s alkalinity, making iron and nitrogen unavailable. USE SOFT WATER and a fertilizer formulated for acid-loving plants. | – Red spider mites are tiny, but speckling and webbing on leaves indicate their presence. Use biological and chemical controls. | ||
| – Underwatering Plants kept dry cannot take up water and fail to get the nutrients water brings, leading to undernourishment and yellow lower leaves. CHECK REGULARLY for dry soil and water accordingly. | – Fallen petals left lying on foliage cause molds to develop. Pelargoniums are particularly prone to this problem. Deadhead regularly. | ||
| – Overwatering Waterlogged roots cannot function properly and do not provide plants with essential water or nutrients, so the leaves yellow and stems wilt despite the potting mix being moist. DO NOT LEAVE plants standing in water-filled saucers. | – Powdery mildew is generally a begonia problem, and only on plants stressed by drought or heat. Improve conditions and spray with fungicide. | ||
| – Aphids increase rapidly in warm conditions. Rub them off or use chemical and biological controls. | |||
| – Mealy bugs hide in leaves and stems. Rub them off, dig them out, or use biological controls. | |||
| – Soft scale insects are easily spotted on stems and leaves. Rub off or use biological controls. | |||
| – Whitefly – Best controlled with biological controls or chemicals to kill all stages of their life cycle. | |||
| – Sooty mold is nature’s way of telling you have a problem with aphids, scale insects, whitefly or mealy bugs, all of which exude a sticky waste on which the mold grows. Cure your insect problem and you cure your sooty mod problem. |